Screen scaling SBC/VDI on Windows 8(.1), 10 and Server 2012 (R2) and 2016
Here’s some background information. The customer I was migrating was using Citrix XenApp 7.15 on Microsoft Windows Server 2016. During the User Acceptance Test I received a question from a tester if we could adjust the font size on the screen as he had trouble reading it.
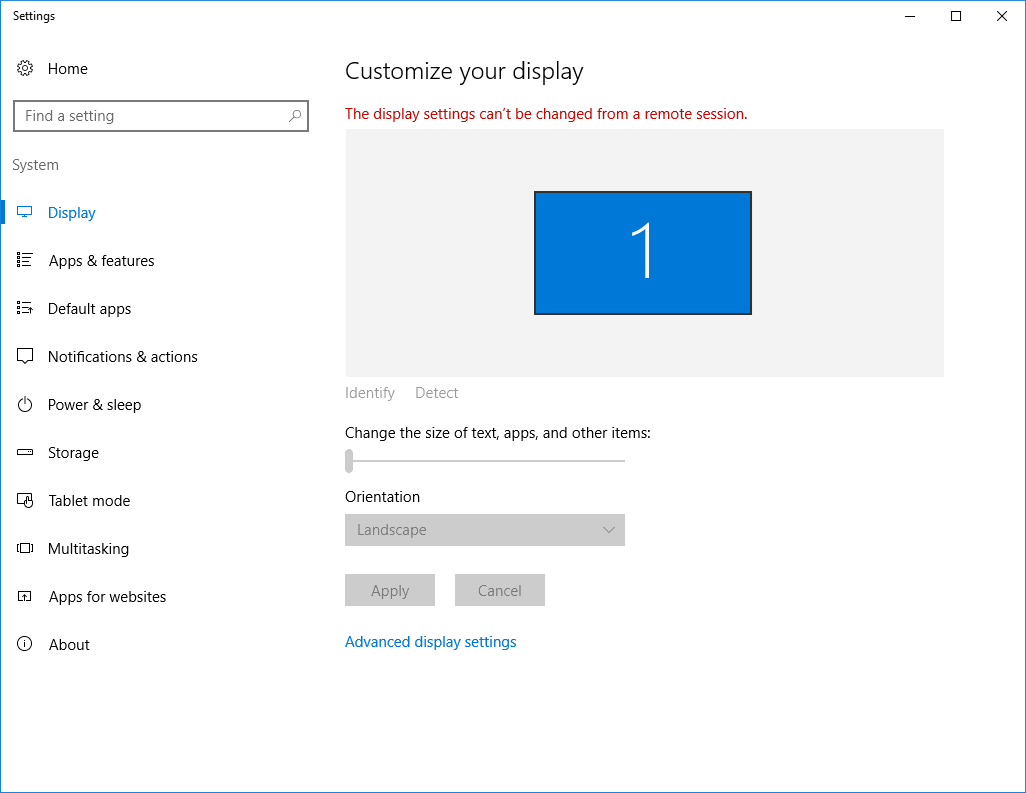
While normally you could just adjust the font size in the control panel as shown in the image below on a thick client on a per-user base, this unfortunately isn’t the case when you work in a XenApp Session, the option is greyed-out.
The next obstacle is the fact that it must be applied prior to initializing the user profile/registry. When you have a User Environment Management (UEM) solution which hooks into the registry prior to initiating the logon process you’re good to go, if not you’ll have to add the settings inside Group Policy Preferences (GPP). Loading the registry values using a script during logon will not work as the session already loaded the default value of 96 DPI.
The last obstacle that I had was that I had to change this on a per-user base instead of per server/silo/environment. This is mostly due to 99% of your userbase preferring 100% scaling instead of 125 or 150. If the above said conditions match your environment read further as I’ll explain what you need.
Requirements:
- Active Directory
- 1 Empty GPO
- 2 Security Groups
- 1 Test User
Settings:
| DPI | Scale factor (%) |
| 96 | 100 |
| 120 | 125 |
| 144 | 150 |
| 192 | 200 |
How-to:
- Create 2 Security Groups, one with 125 pct and the other one with 150 pct in the name;
(I’ve added 192 DPI as a formality in the table, we won’t be using it in this how-to, 96 is the default, no need for a group) - Add the Test User to either the 125 or 150 pct Security Group;
- Create and link empty GPO to the top most OU which contains your SBC/VDI-objects;
- Edit the empty GPO and navigate to GPP-part;
- Create a new entry and use the following values:
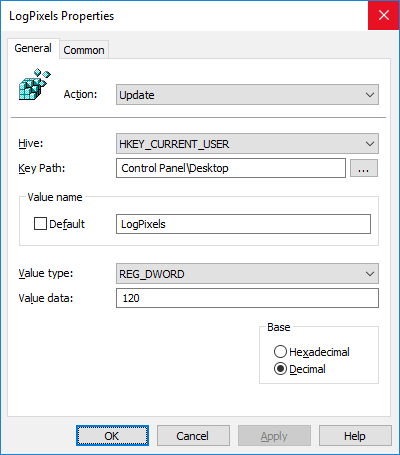
- Update
- HKEY_CURRENT_USER
- Control Panel\Desktop
- LogPixels
- REG_DWORD
- 120 (Decimal)
- Click on Common;

- Check Item-level targeting and click on Targeting;

- Click on New Item and choose the 120 pct Security Group;
- Repeat the process for the 150 pct value;
- Run gpupdate /force on an SBC/VDI-object and force the test user to logon to that machine;
You should see a larger Graphical User Interface (GUI) which you can check by opening the Registry and navigating to the LogPixels-value in HKCU\Control Panel\Desktop.